Wiggle ya Worm Rigs | Surf, Reef & Offshore Fishing Rigs

  • Home
  • Rig Finder
  • Ask Wiggle
  • rigs explained
    • RIGS EXPLAINED
    • Best Fishing Rigs Guide
    • Best Reef Rigs in AU
    • Best whiting rigs AU
    • Best Bream rigs AU
    • Best Tailor Rigs AU
    • Best Kingfish Rigs AU
    • Australian Salmon Rigs AU
    • Best Flathead Rigs AU
    • Gummy Shark Rigs Guide
    • Best Gummy Shark Rigs
    • Mulloway Rigs Australia
    • Snapper Rigs in Australia
    • Flasher Rigs Guides
    • Drone Fishing Guide
    • Land-Based Shark Guide
    • Shark Fishing Rigs
    • Shark Release Guide
    • Long Casting Pulley Rigs
    • Slide Bait Rigs
    • Fish Finder rigs
    • Paternoster Rigs
    • Sliding Snell Rigs
  • Rig Decision Guide AU
  • Shop
    • Online Shop
    • Drone Fishing System
    • State Packs
    • quick-change-system
    • Swains Slayer Series
  • Wiggle Wins
  • info
    • Wiggle's Blog
    • About Us
    • Contact Wiggle ya Worm
  • More
    • Home
    • Rig Finder
    • Ask Wiggle
    • rigs explained
      • RIGS EXPLAINED
      • Best Fishing Rigs Guide
      • Best Reef Rigs in AU
      • Best whiting rigs AU
      • Best Bream rigs AU
      • Best Tailor Rigs AU
      • Best Kingfish Rigs AU
      • Australian Salmon Rigs AU
      • Best Flathead Rigs AU
      • Gummy Shark Rigs Guide
      • Best Gummy Shark Rigs
      • Mulloway Rigs Australia
      • Snapper Rigs in Australia
      • Flasher Rigs Guides
      • Drone Fishing Guide
      • Land-Based Shark Guide
      • Shark Fishing Rigs
      • Shark Release Guide
      • Long Casting Pulley Rigs
      • Slide Bait Rigs
      • Fish Finder rigs
      • Paternoster Rigs
      • Sliding Snell Rigs
    • Rig Decision Guide AU
    • Shop
      • Online Shop
      • Drone Fishing System
      • State Packs
      • quick-change-system
      • Swains Slayer Series
    • Wiggle Wins
    • info
      • Wiggle's Blog
      • About Us
      • Contact Wiggle ya Worm
  • Sign In
  • Create Account

  • Orders
  • My Account
  • Signed in as:

  • filler@godaddy.com


  • Orders
  • My Account
  • Sign out

Signed in as:

filler@godaddy.com

  • Home
  • Rig Finder
  • Ask Wiggle
  • rigs explained
    • RIGS EXPLAINED
    • Best Fishing Rigs Guide
    • Best Reef Rigs in AU
    • Best whiting rigs AU
    • Best Bream rigs AU
    • Best Tailor Rigs AU
    • Best Kingfish Rigs AU
    • Australian Salmon Rigs AU
    • Best Flathead Rigs AU
    • Gummy Shark Rigs Guide
    • Best Gummy Shark Rigs
    • Mulloway Rigs Australia
    • Snapper Rigs in Australia
    • Flasher Rigs Guides
    • Drone Fishing Guide
    • Land-Based Shark Guide
    • Shark Fishing Rigs
    • Shark Release Guide
    • Long Casting Pulley Rigs
    • Slide Bait Rigs
    • Fish Finder rigs
    • Paternoster Rigs
    • Sliding Snell Rigs
  • Rig Decision Guide AU
  • Shop
    • Online Shop
    • Drone Fishing System
    • State Packs
    • quick-change-system
    • Swains Slayer Series
  • Wiggle Wins
  • info
    • Wiggle's Blog
    • About Us
    • Contact Wiggle ya Worm

Account


  • Orders
  • My Account
  • Sign out


  • Sign In
  • Orders
  • My Account

Sliding Snell Rigs Explained

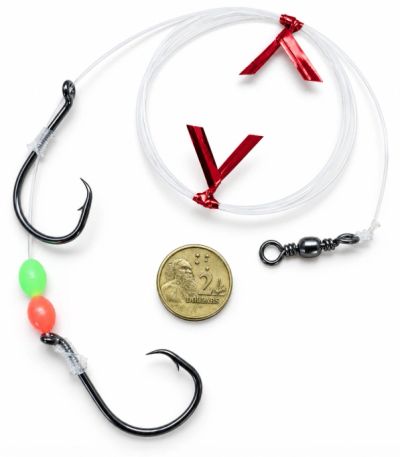
Wiggle ya Worm mono sliding snell rig with a fixed bottom hook, adjustable top hook, coloured beads

Adjustable Hook Spacing for Longer Baits

 A sliding snell rig uses two hooks on the same bait trace: a fixed bottom hook and an adjustable top hook that slides along the leader.


The top hook is repositioned each time the rig is baited, allowing the spacing between the hooks to match the length of the bait being used.


This makes sliding snell rigs particularly useful for longer or variable-sized baits such as squid, pilchards, fish fillets, whole fish and livebaits. Both hooks can be positioned along the bait while keeping their points properly exposed.


The two-hook arrangement also provides hook coverage towards both ends of the bait, making it useful when targeting fish that may strike at either the head or tail.


Sliding snell rigs are used from beaches, rocks and boats for species including mulloway, snapper, kingfish and gummy sharks.


This guide explains how the adjustable hook works, how to match the spacing to your bait and how to keep longer baits straight and securely rigged.

Why Hook Spacing Must Match the Bait

 Long baits vary considerably in length, shape and thickness. Using fixed hook spacing can leave the bait stretched between the hooks, bunched up or supported in the wrong places.


With a sliding snell rig, the top hook can be moved until both hooks suit the natural length of the bait.


Correct spacing helps:


  • Keep the bait straight 
  • Support the bait at two points 
  • Position hooks towards different strike areas 
  • Keep both hook points properly exposed 
  • Reduce bait twisting or spinning in the current 


Fish may take a bait head-first, strike the tail or grab it across the middle. Placing hooks towards both ends of a longer bait increases the chance that one of the exposed hook points is in the area being struck.


The hook spacing should be adjusted for every new bait rather than assuming that two baits from the same packet will be identical.

How the Sliding Top Hook Stays in Position

 The sliding top hook is held on the leader by the friction created through the snell. It takes deliberate hand pressure to move the hook, allowing it to be positioned to suit the bait and remain where it is set during normal baiting and handling.


The hook is adjustable rather than permanently locked. If a fish takes the top hook and applies enough pressure, the hook may move along the leader towards the fixed bottom hook.


Because every rig is hand tied, the amount of pressure required to adjust the top hook can vary slightly between rigs.


For longer or softer baits, we recommend using bait elastic after both hooks have been positioned. 


Wrapping the bait and hooks together helps:


  • Keep the bait straight 
  • Hold both hooks in the selected positions 
  • Prevent the bait moving along the hooks during the cast 
  • Keep the hook points properly exposed 


Bait elastic helps the bait and hooks remain together as one controlled unit during the cast and while fishing.

Sliding Snell Rig — Construction Example

How Wiggle ya Worm Sliding Snell Rigs Are Built

The range includes different hook styles, hook sizes, leader strengths and bait-trace materials for surf, estuary, reef and offshore fishing.


Wiggle ya Worm also makes a Snapper rig with two fixed hooks. That rig provides consistent, permanent hook spacing and should not be confused with an adjustable sliding snell rig.


The important difference is simple:


  • Sliding snell rig: one fixed hook and one adjustable hook 
  • Fixed twin-hook rig: both hooks remain in permanent positions 


Every rig is individually hand tied in Queensland.


Explore the current Sliding Snell Rig range.


Baits Suited to Sliding Snell Rigs

 Sliding snell rigs are particularly useful when the length of the bait changes from one bait to the next.

Suitable baits include:


  • Whole pilchards 
  • Garfish 
  • Long fish fillets and strip baits 
  • Whole squid 
  • Squid strips 
  • Eels 
  • Livebaits such as yakka and slimy mackerel 


The sliding top hook can be moved to suit each bait while the fixed bottom hook provides a consistent lower attachment point. This allows both hooks to support the bait without stretching it or forcing it to bunch between fixed hook positions.


Twin-hook arrangements are also useful when rigging longer baits for Flathead. See the Flathead Rig Guide.


When using whole pilchards with ganged hooks rather than a sliding snelled pair, see the Tailor Rig Guide.


For livebait rigging around reef edges and structure, see the Kingfish Rig Guide.

How to Bait a Sliding Snell Rig

 Lay the bait beside the rig and move the sliding top hook until the two hooks align with suitable positions towards each end of the bait.


Attach the bait to both hooks, then check that:


  • The bait sits straight between the hooks 
  • Neither hook is pulling the bait out of shape 
  • Both hook points and hook gapes remain exposed 
  • The top hook is positioned firmly against the bait 
  • No loose section of bait can fold or spin in the current 


For longer, softer or heavier baits, wrap bait elastic around the bait and hook shanks to hold everything together.


Use enough elastic to secure the bait without covering the hook points or closing the hook gapes. The finished bait should remain straight and securely attached while leaving both hooks clear to make contact with the fish.

Matching the Hook Style and Size to the Bait

 Sliding snell rigs can be built with circle hooks or beak hooks depending on the bait, target species and how the rig will be fished.


Whichever hook style is used, the hook must be large enough for its point and gape to remain clear after the bait has been attached. A hook buried deeply in a thick bait can prevent it from making proper contact with the fish.


Circle-hook sliding snell rigs are commonly used when baits are left for the fish to take and move away with. Keep both hook gapes clear and apply steady pressure rather than striking aggressively.


Beak-hook versions can be used where the fisho intends to set the hooks manually.


The hook spacing and bait size must work together. Increasing the bait length without checking the hook positions can leave both hooks concentrated at one end of the bait.


For more information about hook patterns and choosing a suitable size, see Choosing the Right Fishing Hook.

Choosing a Mono or Wire Bait Trace

 Sliding snell rigs can be built with either monofilament or wire. The correct material depends on the target species, the ground being fished and what else may take the bait.


Mono sliding snell rigs are commonly used for:


  • Mulloway 
  • Snapper 
  • Kingfish 
  • Flathead 
  • General surf, reef and inshore fishing 


Mono provides flexibility and allows longer baits and livebaits to move naturally.


Wire sliding snell rigs are useful when:


  • Tailor or other toothy fish are active 
  • Sharks may take the bait 
  • Fishing mixed-species water where bite-offs are a genuine risk 
  • Additional protection is needed around abrasive mouths 


Wire provides greater bite protection but should be selected for a clear reason rather than automatically being used for every sliding snell setup.


Match the bait-trace strength to the target species, likely bycatch, bait size and ground being fished.

Species Commonly Targeted with Sliding Snell Rigs

Sliding snell rigs are not restricted to one species. They are selected primarily because of the bait being used and the need for adjustable hook spacing.


They are commonly used when targeting:


  • Mulloway 
  • Snapper 
  • Kingfish 
  • Gummy sharks 
  • Flathead 
  • Other fish that take longer baits or may strike towards either end 


The required hook size, leader strength and bait-trace material will vary between these species, but the adjustable top hook performs the same job: matching the hook spacing to the bait.

Common Sliding Snell Rigging Mistakes

 Using the same hook spacing for every bait

Baits vary in length and thickness. Reposition the sliding hook whenever the next bait requires different spacing.


Stretching or bunching the bait between the hooks

The hooks should support the bait in its natural shape. Incorrect spacing can pull the bait tight or force it to fold.


Burying the hook points or filling the hook gapes

Both hook points and gapes need to remain exposed after baiting and wrapping with elastic.


Leaving the sliding hook away from the bait

The top hook should sit firmly in the selected position against the bait rather than hanging loosely on the leader.


Not securing longer or softer baits

Bait elastic helps hold the bait and both hooks together during casting and while fishing.


Wrapping bait elastic over the hook points

Secure the bait around the hook shanks while keeping the points and gapes clear.


Using hooks that do not suit the bait size

The hooks must be large enough to remain exposed without being so widely spaced that the bait is stretched out of shape.

Choosing the Right Rig for Your Bait

 A sliding snell rig is most useful when bait length varies or when hook coverage is needed towards both ends of a longer bait.


Choose the hook size, leader strength and bait-trace material for the target species and fishing conditions, then adjust the hook spacing to suit the individual bait.


For help choosing a complete setup:


  • Use the Rig Finder to match rigs to your species, location and fishing style 
  • Start with the Australian Fishing Rig Decision Guide when comparing different rig types 
  • Explore Rigs Explained to learn how other fishing rigs work 

Understanding how the hooks and bait work together makes it easier to select the correct rig before heading out.


BAIT UP. CAST IN. HANG ON.

Copyright © 2026 Wiggle ya Worm - Quality Hand Built Fishing Rigs - All Rights Reserved.

  • Privacy Policy
  • Terms and Conditions

Powered by