Wiggle ya Worm Rigs | Surf, Reef & Offshore Fishing Rigs

  • Home
  • Rig Finder
  • Ask Wiggle
  • rigs explained
    • RIGS EXPLAINED
    • Best Fishing Rigs Guide
    • Best Reef Rigs in AU
    • Best whiting rigs AU
    • Best Bream rigs AU
    • Best Tailor Rigs AU
    • Best Kingfish Rigs AU
    • Australian Salmon Rigs AU
    • Best Flathead Rigs AU
    • Gummy Shark Rigs Guide
    • Best Gummy Shark Rigs
    • Mulloway Rigs Australia
    • Snapper Rigs in Australia
    • Flasher Rigs Guides
    • Drone Fishing Guide
    • Land-Based Shark Guide
    • Shark Fishing Rigs
    • Shark Release Guide
    • Long Casting Pulley Rigs
    • Slide Bait Rigs
    • Fish Finder rigs
    • Paternoster Rigs
    • Sliding Snell Rigs
  • Rig Decision Guide AU
  • Shop
    • Online Shop
    • Drone Fishing System
    • State Packs
    • quick-change-system
    • Swains Slayer Series
  • Wiggle Wins
  • info
    • Wiggle's Blog
    • About Us
    • Contact Wiggle ya Worm
  • More
    • Home
    • Rig Finder
    • Ask Wiggle
    • rigs explained
      • RIGS EXPLAINED
      • Best Fishing Rigs Guide
      • Best Reef Rigs in AU
      • Best whiting rigs AU
      • Best Bream rigs AU
      • Best Tailor Rigs AU
      • Best Kingfish Rigs AU
      • Australian Salmon Rigs AU
      • Best Flathead Rigs AU
      • Gummy Shark Rigs Guide
      • Best Gummy Shark Rigs
      • Mulloway Rigs Australia
      • Snapper Rigs in Australia
      • Flasher Rigs Guides
      • Drone Fishing Guide
      • Land-Based Shark Guide
      • Shark Fishing Rigs
      • Shark Release Guide
      • Long Casting Pulley Rigs
      • Slide Bait Rigs
      • Fish Finder rigs
      • Paternoster Rigs
      • Sliding Snell Rigs
    • Rig Decision Guide AU
    • Shop
      • Online Shop
      • Drone Fishing System
      • State Packs
      • quick-change-system
      • Swains Slayer Series
    • Wiggle Wins
    • info
      • Wiggle's Blog
      • About Us
      • Contact Wiggle ya Worm
  • Sign In
  • Create Account

  • Orders
  • My Account
  • Signed in as:

  • filler@godaddy.com


  • Orders
  • My Account
  • Sign out

Signed in as:

filler@godaddy.com

  • Home
  • Rig Finder
  • Ask Wiggle
  • rigs explained
    • RIGS EXPLAINED
    • Best Fishing Rigs Guide
    • Best Reef Rigs in AU
    • Best whiting rigs AU
    • Best Bream rigs AU
    • Best Tailor Rigs AU
    • Best Kingfish Rigs AU
    • Australian Salmon Rigs AU
    • Best Flathead Rigs AU
    • Gummy Shark Rigs Guide
    • Best Gummy Shark Rigs
    • Mulloway Rigs Australia
    • Snapper Rigs in Australia
    • Flasher Rigs Guides
    • Drone Fishing Guide
    • Land-Based Shark Guide
    • Shark Fishing Rigs
    • Shark Release Guide
    • Long Casting Pulley Rigs
    • Slide Bait Rigs
    • Fish Finder rigs
    • Paternoster Rigs
    • Sliding Snell Rigs
  • Rig Decision Guide AU
  • Shop
    • Online Shop
    • Drone Fishing System
    • State Packs
    • quick-change-system
    • Swains Slayer Series
  • Wiggle Wins
  • info
    • Wiggle's Blog
    • About Us
    • Contact Wiggle ya Worm

Account


  • Orders
  • My Account
  • Sign out


  • Sign In
  • Orders
  • My Account

When Should You Use Flasher Rigs?

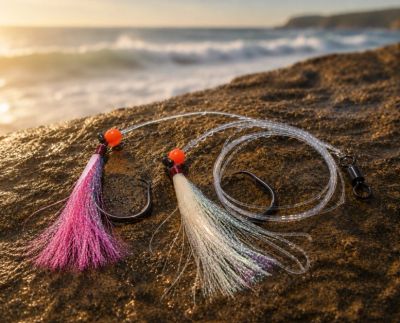
Hand-tied snapper flasher rig with brightly coloured fibres displayed on coastal rock beside the wat

Match the Amount of Flash to the Conditions

A flasher rig places reflective material beside the hook and bait, helping fish notice it as the fibres move and catch the available light.


Flasher rigs are particularly useful when:


• Breaking surf and whitewater reduce visibility
• Sand, current or runoff has stirred the water
• Fishing around dawn, dusk or under overcast skies
• Fishing deeper water where less natural light reaches the bait
• Fish are moving quickly through the area and have limited time to find the bait


As visibility improves, reduce the amount of flash. A lightly dressed flasher can provide enough movement and contrast in clear water without overpowering the natural bait.


The aim is not to use the brightest rig available. It is to make the bait easier to locate while keeping the amount of flash appropriate for the water clarity, available light and behaviour of the fish.


This guide explains how those conditions affect flasher choice and when a standard bait rig may be the better option.

How Flasher Material Helps Fish Find the Bait

Flasher material does not produce its own light. It reflects the available light as the fibres move with the current, creating brief changes in brightness, colour and contrast beside the hook.


This movement can help fish:


• Notice the hook and bait against the surrounding water
• Locate the bait more quickly in reduced visibility
• Track the bait as it moves in current
• Focus their strike close to the hook


The flasher works alongside the bait rather than replacing it. The reflective fibres provide the visual cue, while the natural bait supplies scent and something for the fish to eat.


Positioning the flash close to the hook concentrates that colour and movement where the fish needs to strike. This is particularly useful when fish are moving through the area quickly or only have a brief opportunity to inspect the bait.

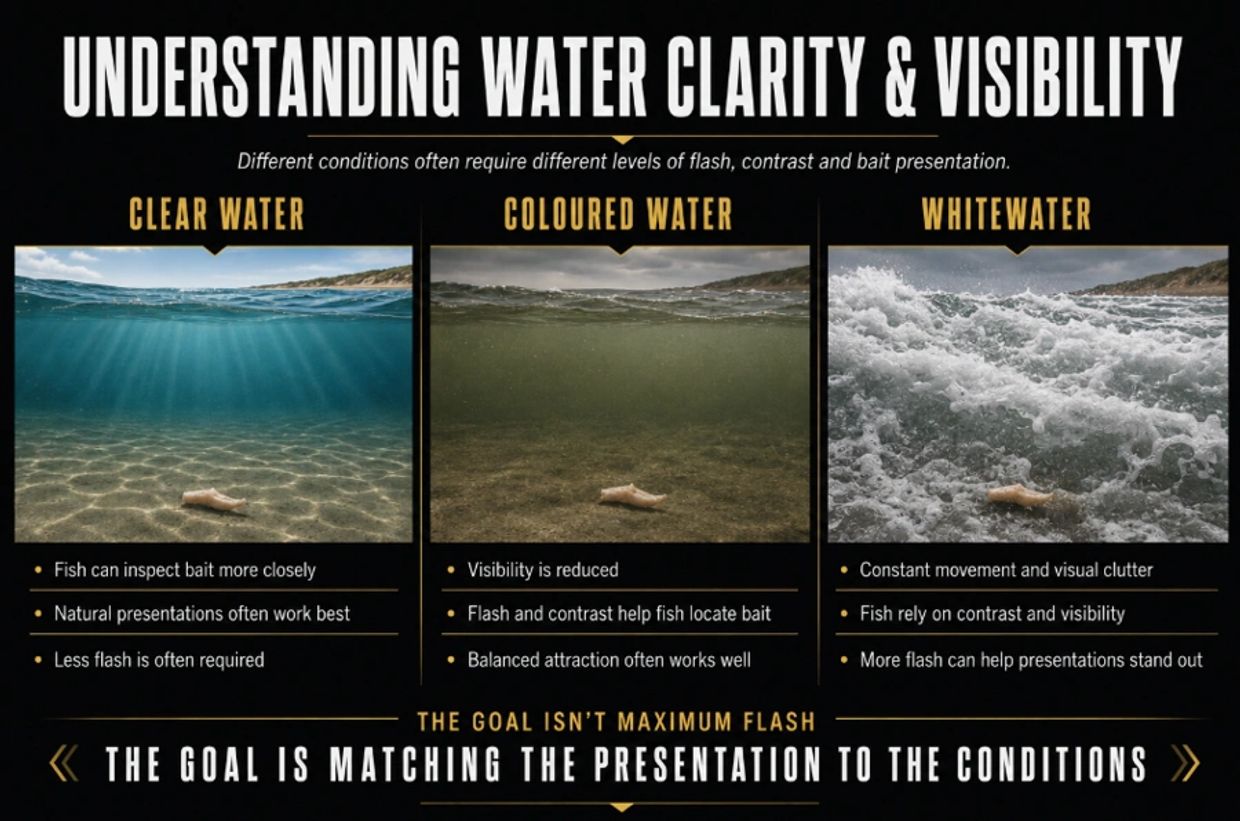
How Water Clarity Changes Flasher Choice

 Water clarity determines how easily fish can see the bait and how much additional flash is useful.


Clear Water

Fish can inspect the bait from farther away. Use a lightly dressed flasher that adds subtle movement and reflection without dominating the natural bait.


Slightly Coloured Water

A moderate amount of flash helps the bait remain visible as suspended sand, runoff or stirred sediment reduces visibility. This is where many general-purpose flasher rigs work particularly well.


Whitewater or Dirty Water

Breaking surf and heavily stirred water give fish less time and distance to locate the bait. Brighter colours, stronger contrast and a larger amount of reflective material can make the bait easier to find.


Water clarity can change with tide, wind, rainfall and wave action. Match the flasher to the water being fished rather than automatically using the same colour and amount of flash on every trip.

Infographic comparing flasher visibility and selection in clear, coloured and whitewater fishing con

Choose the Flasher Hook, Rig Layout and Strength Separately

Choosing a flasher rig involves more than selecting its colour. The hook, leader and rig layout must also suit the bait, target fish and ground being fished.


Use an individual hand-tied flasher hook when you already have a suitable rig and want to add flash close to the bait.


Use a flasher paternoster rig from beaches, rock platforms or boats when the bait needs to be held above the seabed with the flash positioned close to the hooks. From the beach, it keeps the baits visible in surf wash and moving water. From a boat, it provides control when lowering baits onto reef or into deeper water.


Use a heavier flasher paternoster when fishing deeper water, stronger current or hard reef where larger fish must be kept away from structure.


Whichever layout is used:


• Match the hook size to the bait
• Match the leader strength to the fish and ground
• Match the amount of flash to the water clarity and available light
• Keep the bait and hook point clear of excessive flasher material


The flash attracts attention, but the hook, leader and complete rig still need to be appropriate for the fishing conditions.

Choosing a Wiggle ya Worm Flasher Option

The available flasher options cover three different uses:


• Individual Hi-Viz flasher hooks for adding colour and movement to an existing rig


• 60lb flasher paternoster rigs for general reef, offshore and mixed-species fishing


• 80lb flasher paternoster rigs for deeper water, heavier tackle and larger reef species


Choose the individual hook when you already have a suitable rig. Choose a complete paternoster when you need the sinker, backbone and paternoster arms to control the complete setup.


The three options are explained below.

Premium Hand-Tied Hi-Viz Fishing Flashers

 These are individual 6/0 or 8/0 beak hooks dressed with long, high-visibility flasher material rather than complete fishing rigs.


The dressing is significantly larger and fuller than a standard flasher, producing more colour, reflection and movement around the hook. Use these when you want a pronounced visual target rather than the subtle flash provided by a lightly dressed hook.


They suit fishos who want to add a flasher hook to their own leader or rig while selecting the leader strength, sinker arrangement and complete rig layout separately.


Add a small piece of natural bait to provide scent while leaving the hook point and gape exposed.


Choose the 6/0 hook for smaller baits and the 8/0 hook when using a larger bait or targeting larger fish.


Best suited to: Building or modifying bait rigs where strong colour, movement and visibility are required.

View Premium Hand-Tied Hi-Viz Fishing Flashers

60lb Kingfish & Snapper Twisted Flasher Paternoster Rig

 This complete paternoster rig uses a 60lb monofilament backbone with twin 6/0 recurve circle hooks positioned on twisted paternoster arms.


The sinker attaches at the bottom of the rig, allowing the baited flasher hooks to fish above the reef or seabed. The twisted arms help hold the hooks away from the backbone while the flasher material places colour and movement directly beside each bait.


The 60lb construction provides a practical balance for general reef and offshore fishing without stepping up to the heavier 80lb flasher rig.


Best suited to: Snapper, kingfish and mixed reef species around general reef, offshore ground and deeper inshore water.

VIEW 60LB KINGFISH & SNAPPER FLASHER RIG

80lb Snapper Flasher Double Paternoster Rig

This heavier flasher paternoster uses an 80lb monofilament backbone with twin 10/0 sport circle hooks for larger baits and powerful reef species.


The hooks are positioned above the bottom sinker, keeping both baited flashers fishing close to the reef while the paternoster layout provides control in deeper water and stronger current.


The heavier leader, larger hooks and double-hook layout suit situations where the 60lb rig does not provide enough strength or hook size for the bait and fish being targeted.


Best suited to: Deeper offshore reefs, hard structure and larger species including red emperor, nannygai, coral trout and snapper.

VIEW 80LB SNAPPER FLASHER PATERNOSTER RIG

Learn More About Flasher Rigs and Fishing Conditions

Understanding water clarity, colour, rig layout and target species makes it easier to choose when flash will provide a genuine advantage.


Learn how colour and contrast affect bait visibility:


Using Colour and Contrast in Rigs to Trigger More Bites →


See how the sinker, backbone and paternoster arms work together:


Paternoster Rigs Explained →


Choose leader strengths and rig layouts for Australian reef conditions:


Best Reef Fishing Rigs in Australia →


Compare the different bait rigs used for Australian snapper:


Australian Snapper Rigs Guide →


Explore bait rigs suited to kingfish around reef and structure:


Best Kingfish Rigs in Australia →


Not sure which rig suits your target species and fishing conditions?


Use the Rig Finder →


Browse the complete collection of Wiggle ya Worm rig guides:


Fishing Rigs Explained →


BAIT UP. CAST IN. HANG ON.

Copyright © 2026 Wiggle ya Worm - Quality Hand Tied Fishing Rigs - All Rights Reserved.

  • Privacy Policy
  • Terms and Conditions

Powered by