Wiggle ya Worm Rigs | Surf, Reef & Offshore Fishing Rigs

  • Home
  • Rig Finder
  • Ask Wiggle
  • rigs explained
    • RIGS EXPLAINED
    • Best Fishing Rigs Guide
    • Best Reef Rigs in AU
    • Best whiting rigs AU
    • Best Bream rigs AU
    • Best Tailor Rigs AU
    • Best Kingfish Rigs AU
    • Australian Salmon Rigs AU
    • Best Flathead Rigs AU
    • Gummy Shark Rigs Guide
    • Best Gummy Shark Rigs
    • Mulloway Rigs Australia
    • Snapper Rigs in Australia
    • Flasher Rigs Guides
    • Drone Fishing Guide
    • Land-Based Shark Guide
    • Shark Fishing Rigs
    • Shark Release Guide
    • Long Casting Pulley Rigs
    • Slide Bait Rigs
    • Fish Finder rigs
    • Paternoster Rigs
    • Sliding Snell Rigs
  • Rig Decision Guide AU
  • Shop
    • Online Shop
    • Drone Fishing System
    • State Packs
    • quick-change-system
    • Swains Slayer Series
  • Wiggle Wins
  • info
    • Wiggle's Blog
    • About Us
    • Contact Wiggle ya Worm
  • More
    • Home
    • Rig Finder
    • Ask Wiggle
    • rigs explained
      • RIGS EXPLAINED
      • Best Fishing Rigs Guide
      • Best Reef Rigs in AU
      • Best whiting rigs AU
      • Best Bream rigs AU
      • Best Tailor Rigs AU
      • Best Kingfish Rigs AU
      • Australian Salmon Rigs AU
      • Best Flathead Rigs AU
      • Gummy Shark Rigs Guide
      • Best Gummy Shark Rigs
      • Mulloway Rigs Australia
      • Snapper Rigs in Australia
      • Flasher Rigs Guides
      • Drone Fishing Guide
      • Land-Based Shark Guide
      • Shark Fishing Rigs
      • Shark Release Guide
      • Long Casting Pulley Rigs
      • Slide Bait Rigs
      • Fish Finder rigs
      • Paternoster Rigs
      • Sliding Snell Rigs
    • Rig Decision Guide AU
    • Shop
      • Online Shop
      • Drone Fishing System
      • State Packs
      • quick-change-system
      • Swains Slayer Series
    • Wiggle Wins
    • info
      • Wiggle's Blog
      • About Us
      • Contact Wiggle ya Worm
  • Sign In
  • Create Account

  • Orders
  • My Account
  • Signed in as:

  • filler@godaddy.com


  • Orders
  • My Account
  • Sign out

Signed in as:

filler@godaddy.com

  • Home
  • Rig Finder
  • Ask Wiggle
  • rigs explained
    • RIGS EXPLAINED
    • Best Fishing Rigs Guide
    • Best Reef Rigs in AU
    • Best whiting rigs AU
    • Best Bream rigs AU
    • Best Tailor Rigs AU
    • Best Kingfish Rigs AU
    • Australian Salmon Rigs AU
    • Best Flathead Rigs AU
    • Gummy Shark Rigs Guide
    • Best Gummy Shark Rigs
    • Mulloway Rigs Australia
    • Snapper Rigs in Australia
    • Flasher Rigs Guides
    • Drone Fishing Guide
    • Land-Based Shark Guide
    • Shark Fishing Rigs
    • Shark Release Guide
    • Long Casting Pulley Rigs
    • Slide Bait Rigs
    • Fish Finder rigs
    • Paternoster Rigs
    • Sliding Snell Rigs
  • Rig Decision Guide AU
  • Shop
    • Online Shop
    • Drone Fishing System
    • State Packs
    • quick-change-system
    • Swains Slayer Series
  • Wiggle Wins
  • info
    • Wiggle's Blog
    • About Us
    • Contact Wiggle ya Worm

Account


  • Orders
  • My Account
  • Sign out


  • Sign In
  • Orders
  • My Account

Australian Land-Based Shark Fishing Guide

land based shark fishing release shallow surf australia


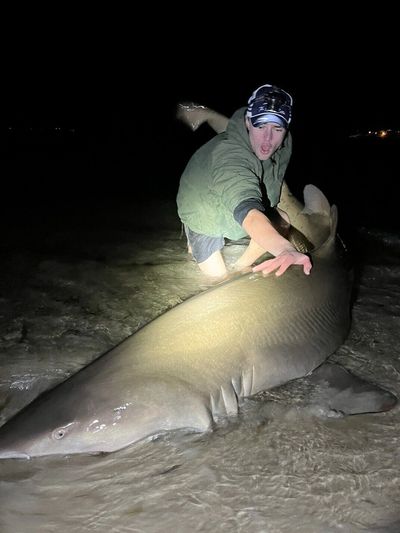
Land-based shark fishing in Australia isn’t the same as what you’ll see in overseas videos or tackle catalogues. Surf conditions, reef edges and the size of fish we regularly hook from the beach all change how rigs need to be built and how sharks should be handled once they’re landed. From leader choice through to hook removal and release, each step affects how safely sharks can be landed from the beach.

Not sure which rig suits your conditions?


See the Australian Fishing Rig Decision Guide →


Or use the Rig Finder to narrow down the best shark rig for your location and target species →
 

Choosing the Right Shark Rig

Most problems in land-based shark fishing start with the wrong leader setup. As fish size increases or structure gets rougher, longer abrasion leaders and proper bite traces become more important than casting distance alone.


Many of the same abrasion and leader-length lessons apply offshore — see Field Notes from Swains for examples from heavy reef conditions → 


See the Shark Rig Guide →


Browse our Shark Fishing Rigs or explore the Drone Fishing System if you're deploying large baits by drone. 


Heavy coated wire traces around 2–3 metres long are commonly used when deploying large baits by kayak or drone, and can still be cast when needed where a full long-leader landing rope system isn’t required. 


Our Standard Shark Drone Fishing Rig follows this proven approach, combining a heavy mono leader backbone with a 200 lb coated wire bite trace for fishos targeting medium to large sharks by drone. 

Casting vs Drone Deployment

Casting still accounts for most land-based shark captures around Australia, especially along surf beaches and estuary entrances where moving between gutters matters. When sharks are holding wider or conditions allow it, longer deployment systems let you fish heavier leaders without sacrificing bait placement.


 For fishos targeting medium to large sharks, the Standard Shark Drone Fishing Rig provides a simpler deployment system. If you're targeting Australia's biggest sharks with oversized baits and maximum abrasion protection, the Apex Pro Shark Rig is our ultimate long mono deployment system. 


See the Shark Rig Guide →

Targeting Gummy Sharks from the Beach

 For many fishos, gummy sharks are where land-based shark fishing starts, especially along southern surf beaches and estuary entrances. They don’t usually need extreme deployment gear, but they do reward clean bait presentation and the right balance between casting distance and bite-trace protection.


See the Gummy Shark Rig Guide →

Slide Baiting Large Sharks

 Slide baiting comes into its own when bigger sharks are moving along deeper gutters, reef edges or headlands that sit just beyond normal casting range, particularly where sharks are holding just outside casting distance.


 Dedicated slide bait shark rigs allow large baits to be positioned beyond casting range while keeping the main leader controlled in the surf zone without moving to full long-leader landing rope systems. 


See the Slide Bait Rig Guide →


Safe Hook Removal and Release

 Landing a shark is only half the job. Planning how you’re going to remove the hook and release the fish safely should happen before the bait even goes out.


See the Shark Release Guide →


 Planning to target sharks with a drone? Our Australian Drone Fishing Guide covers payload management, bait deployment and practical tips for getting the most from your drone fishing system. 


Reducing Fight Time Improves Release Success

Using leader systems that match the fish you’re targeting shortens the fight and gives sharks a better chance of swimming away strongly after release, especially on open surf beaches.


See the Shark Rig Guide →


Choosing the Right Dehooking Equipment

Large hooks and long leaders change how sharks can be handled at the water’s edge. Long-reach dehookers make hook removal safer and quicker without putting you too close to the mouth


See the Shark Dehooker Guide →


Common Land-Based Shark Fishing Mistakes

 A lot of release problems come from fighting sharks too long on light gear, dragging them too far onto dry sand, or trying to remove hooks without the right tools ready before landing.


See the Shark Release Guide →


Successful land-based shark fishing in Australia starts with the right rig, the right landing approach and a release plan sorted before the bait even hits the water — not after the shark is on the beach.


 Drone fishing has made it possible to deploy larger baits further offshore than ever before, but it doesn't change the fundamentals of successful shark fishing. The right rig, proper preparation and safe release practices remain just as important, whether your bait reaches the water with a cast, a slide bait or a drone. 

Copyright © 2026 Wiggle ya Worm - Quality Hand Tied Fishing Rigs - All Rights Reserved.

  • Privacy Policy
  • Terms and Conditions

Powered by